
I suppose you could go in a couple of directions with such
a title, including ones not so appropriate, but since this is an RVing blog –
we’re talkin’ propane.
For those entering the RV world with a brand new rig, you
may be thinking there isn’t much to worry over. As long as the tanks are full,
you’re good to go. Not so fast. Remember, those tanks contain an explosive
substance which can not only ruin your day. Anyone within your vicinity will be
affected too. It’s not a bad idea to have the propane system and appliances checked
before ever using them, preferably at the dealership during the delivery
walk-thru. There is always the possibility something broke or disconnected
during shipment from the factory to the dealership. If there is a problem, make
sure a warranty covers the fix. Pay close attention to manufacturer
instructions concerning safe operation of the entire system, read up on how the
regulator works (be prepared to replace it every few years), make sure your
interior alarms are always working, and resign yourself to the fact that it
really is a good idea to have a properly equipped professional inspect the
system periodically*. Once a year is a good rule of thumb if your RV gets a lot
of use and/or travels long distances regularly. Propane is another good reason
to take yourself and the new RV to the many boot camps offered by various
organizations. New-to-RVing vintage owners, who purchase from a restoration
professional, should also follow this advice.
Here’s one good article about RV propane. Though it’s
skewed a bit toward motorhomes, the info is applicable to any RV with a propane
system.
Ambitious DIYers shouldn’t do anything with their propane until
thoroughly educated. Whatever you do, don’t just assume the old system is fine.
Remember, vintage is classified as being 25 yrs. or older. Copper, being a soft
metal, can degrade over time. Which means it becomes brittle. A trailer which traveled lots of miles has had
plenty of opportunities for things to break and leak. While water leaks are a
big problem, they are nothing compared to gas.
Ok, so you need new propane lines. What’s next? If you’ve
done your research and really don’t feel comfortable doing this job yourself,
hire RV professionals to do the work for you. Proceeding on your own? Then read
on to learn of our experience replacing our propane lines.
It seems to make the most sense to replace like with like
in this instance. Darn it! This is another project where you won’t find it that
easy. Copper is one of those commodities where the manufacturers don’t seem to
have a standard nomenclature. Until you learn to decipher it. To install a new
copper system, you also need to know there is no such thing as one-stop
shopping, unless you have a specialty supplier in your area. Even then fittings
in less common sizes might not be easy to find. The specialty supplier down the
road from us had very few flared fittings in their inventory. (Several empty
bins though.) You might find an RV dealership who sells propane fittings. Visit
those in your area that have parts departments and request their catalog. Some
will have a really comprehensive book. If their store doesn’t actually stock
items, they will order them for you. Our gas line is now finished, and the most
aggravating and time consuming part was assembling all the components. It took
us longer to find everything than it did to install it.
We must mention briefly, after consulting with our RV
repair shop, that they were phasing out the use of copper for gas lines, and
replacing it with black pipe. However, it’s not our area of expertise. Going
the route of black pipe would definitely mean hiring a pro as far as we’re concerned.
To
do a copper system, here’s your basic shopping list.
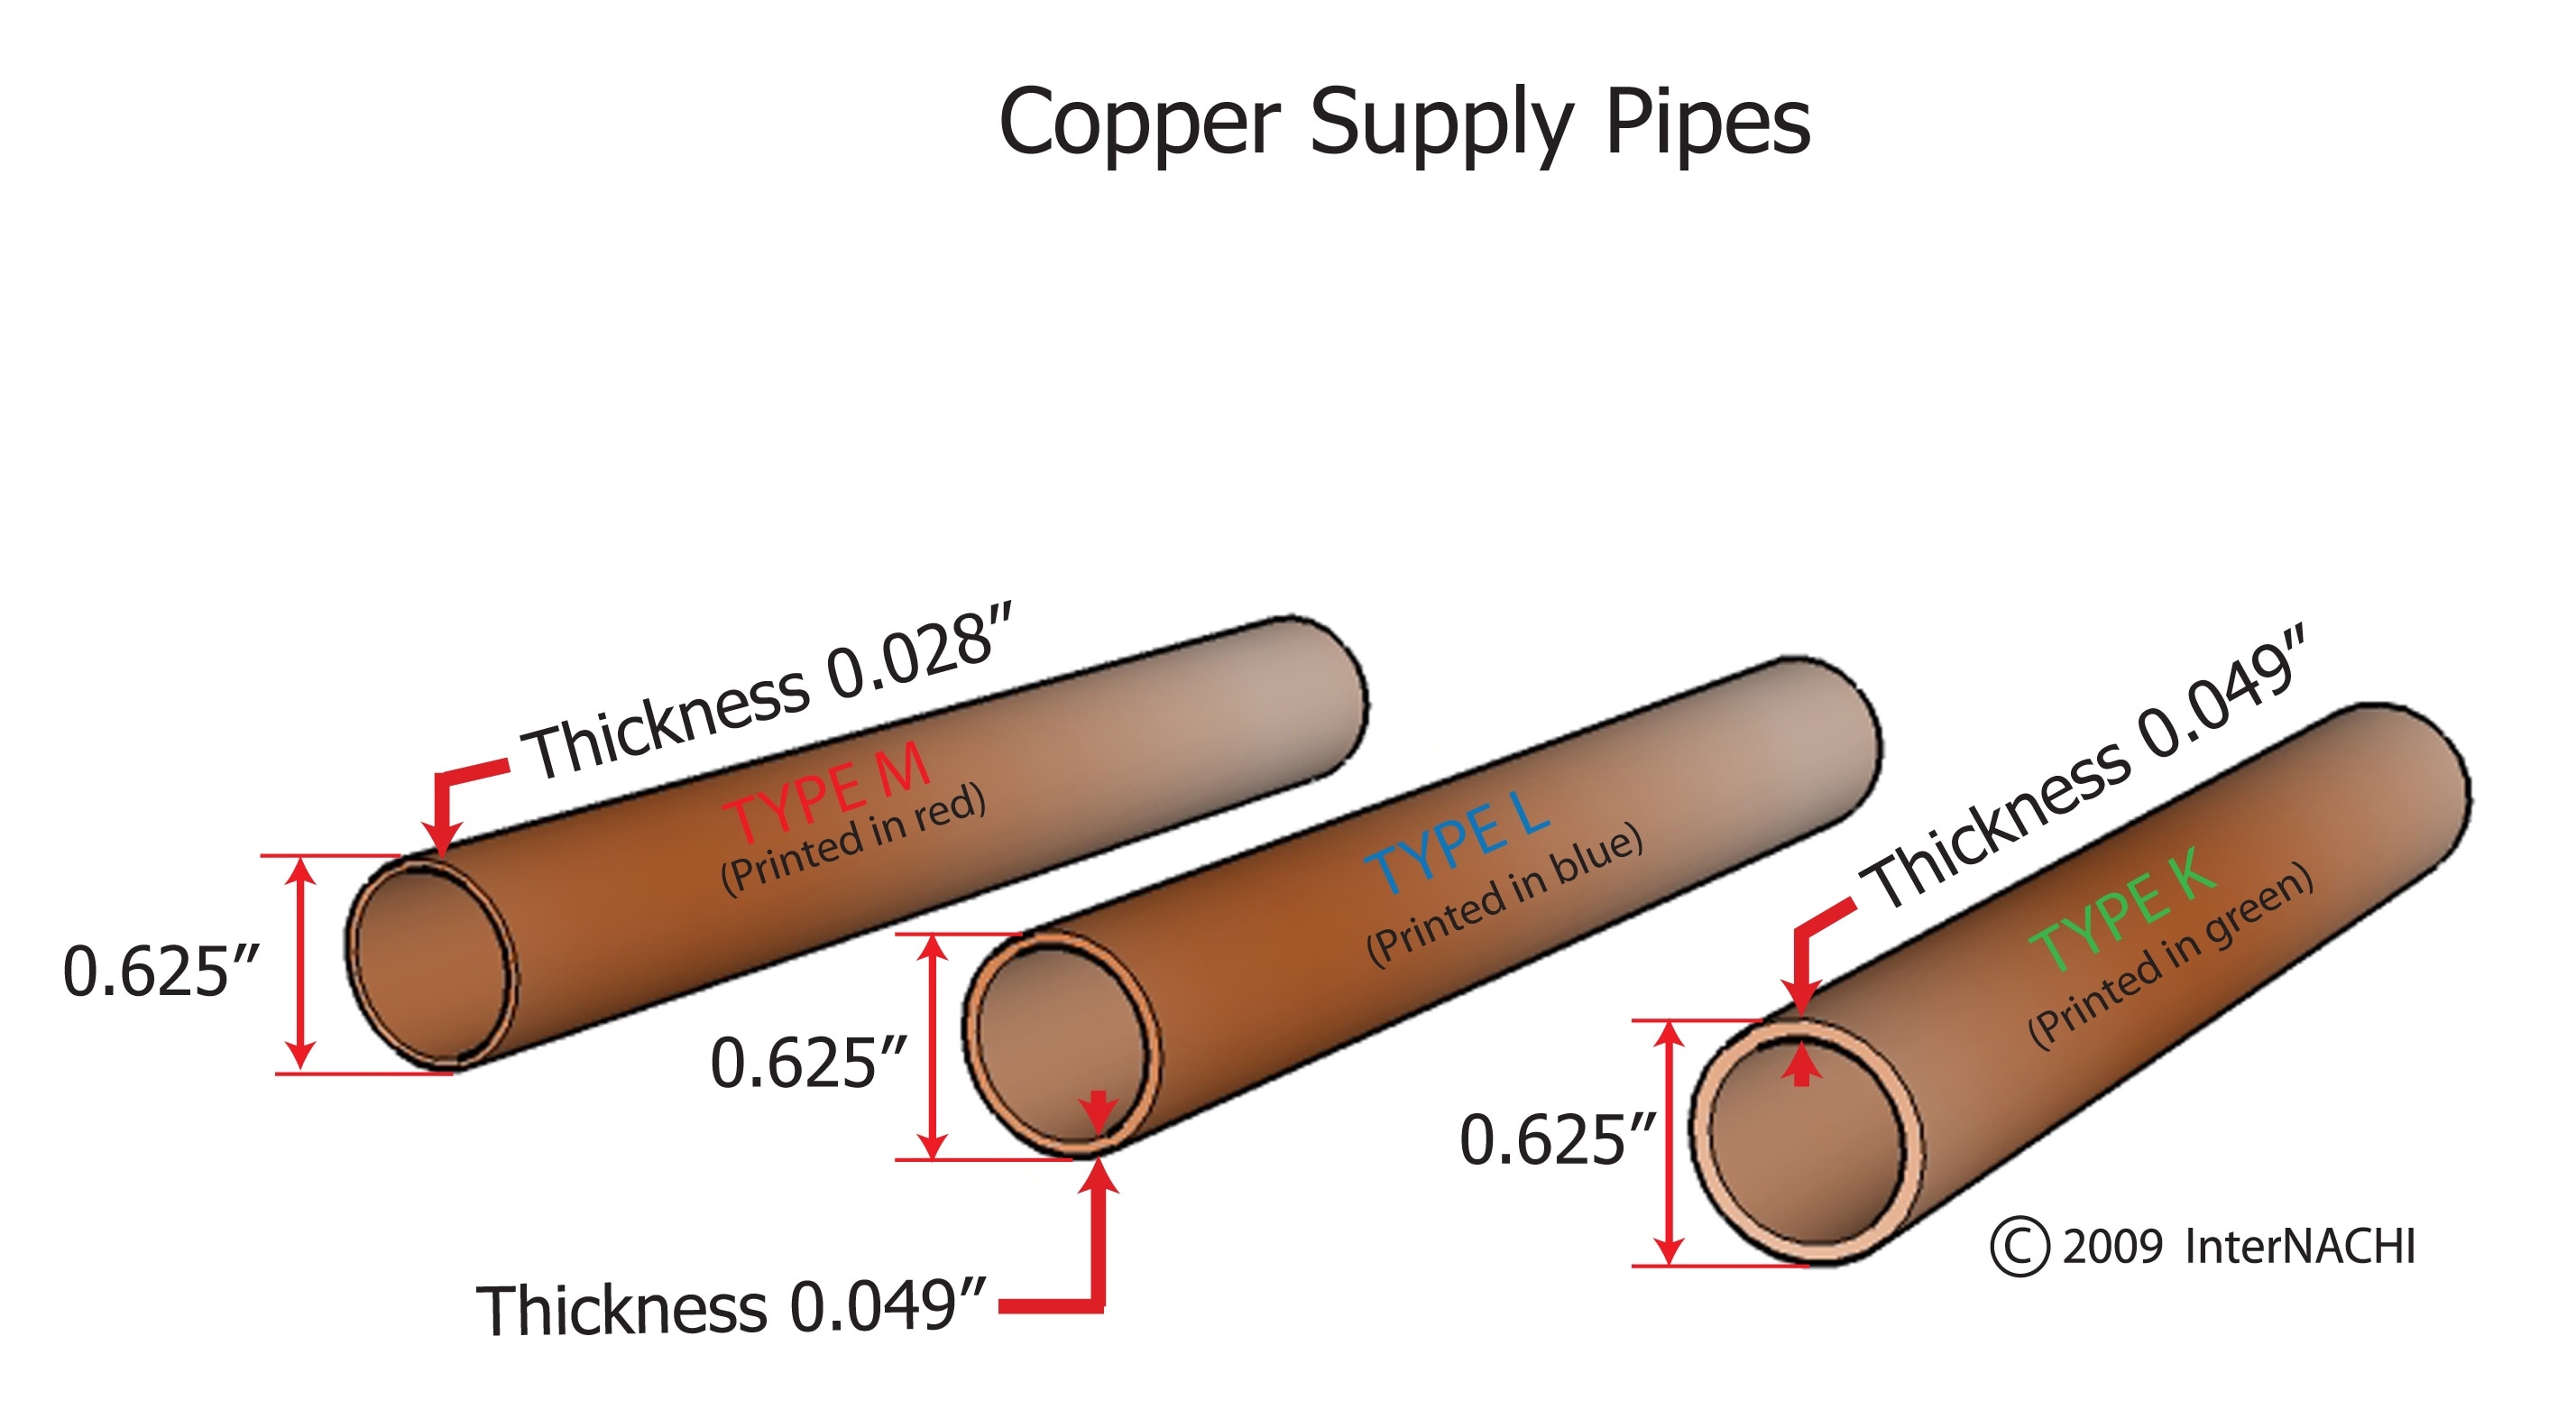
Type L Copper - The
walls of some copper tubing are thinner than others and aren’t recommended for
propane lines (Type M). Type L is still malleable but not as likely to break if
you need to bend it a bit. Type K, which has even thicker walls, might be
suggested by some. We found it difficult to locate.
You
need to consider the routes of your lines carefully. Make sure nothing is going
to
pinch, rub, or break the pipe. Be careful
not to introduce sharp bends. They can create
creases, which may cause premature failure. Buy a bit more than you think is needed. Following the same route as the
manufacturer is probably OK, but make sure the original holes in the belly pan
will provide a tight fit when securing the mounting brackets. If not, fill or cover them, otherwise you might eventually
get water inside the pans where you
don’t want it.

Flare Brass Fittings/Connectors
These fittings include flare
nuts, tees and elbows; as well as gate style shut-off valves for each of your
appliances. Do not use compression fittings. If you’ve never used flared
fittings, try to find an opportunity to get a hands-on education before
replacing your propane lines. Besides the possibility of wasting too much
material, this is not the time to be learning/practicing a new skill.

Pipe
Cutter/Flaring Tools

Aluminum LIne Clamps
Use the type pictured. The line has to be
secured on the underside of your trailer, outside of the belly pans. Bare metal
brackets are not a good idea. Friction due to travel will wear on the copper,
and eventually cause breaks in the line. Make sure the clamps are the correct size for your tubing. The reason for keeping your propane lines from vibrating too much should be obvious. (If you've read some of our other posts you may have noticed the mention of many not-nice roads.)

Two-stage
Regulator - Connected to the tanks and main line. The main line connection
will be flare to pipe.

Hoses -To
connect the tanks to the Regulator, and a Hose to connect the Regulator to the
main line. (Must be rated for propane use.)
Here are the basics of a propane system. When your tanks
are filled, it will be around 80%. Only gas vapor should be entering your lines.
(Not liquid) The head room in your tanks allows that process to start, and
accommodates any expansion of gas during temperature fluctuations. The
regulator controls the flow of the vapor, making sure the appropriate amount is
entering the gas lines. The main line carries the vapor to the rest of the
system, meaning it’s the largest in diameter. The gas must be reduced before it
reaches the appliances. Therefore, the lines to the appliances have to be
smaller. The main rule, regardless of the pipe diameters you end up using, is
always large to small. Not small to
large. No exceptions. The main line diameter is determined by how many runs and
total BTU’s.
Sounds simple doesn’t it. We thought so too, until we
started shopping for parts. Then we encountered the conundrum known as
manufacturer labeling. (Cue maniacal laugh) The copper supply lines and fittings
come in two designations. Inner Diameter (ID) and Outer Diameter (OD). We knew
our old lines were 5/8” and 3/8” OD. Once we got it sorted out that we needed
Type L copper, it got easier to decipher the labeling on the pipe. At the big
box home improvement stores, the 5/8” copper pipe is labeled as ½”. Which is
referring to the inner diameter. When looking for the flared fittings, this
pipe will require 5/8” OD flare nuts, which sit on the outside of the pipe. The
fittings which thread into the flare nuts should be the same size. Confused yet?
Now, here’s our most frustrating part of dealing with 5/8” fittings. We needed
5/8”x3/8”x5/8” tees to reduce from the main line to the appliances. That
particular fitting is hard to find at the big boxes. We did finally locate it
at a hardware store, along with the gate valves we wanted. Since we hadn’t
bought them anywhere else, we got most of the other fittings there too.
However, they were short on the number of tees and valves we wanted, which
resulted in a special order from their warehouse. That order came up one short
on a tee. We got lucky and did manage to dig up 1 and a spare on Amazon.
The 3/8” Type L (1/4” ID) wasn’t totally trouble free
either. Once again it was labeling which was tripping us up. We could find 2
foot pieces of tubing labeled as Type L at the box store, but we needed longer
lengths. It’s not a good idea to use lots of connections until you reach your
desired length. Connections are potential leaks. None of the copper coils were
labeled as Type L. The only one which came in the correct diameter was labeled
as Refrigeration, was 50 ft. long and a little over a dollar a foot. (Ouch!)
Turns out this is actually Type L, with an added step of capping the ends,
ensuring no moisture is inside the tube. It took us more than a week to dig up
and verify the information.
Needless to say, no matter how you approach this project,
pro or DIY, it isn’t very cheap to do. Buying the copper doesn’t seem so bad.
But, by the time you have all your brass fittings you could be looking at a
sizable chunk of change. Your actual cost will be determined by the size of
your RV and number of appliances using gas.
The expense will not stop with the gas lines either. Beyond
just filling your tanks (AKA cylinders), there are government required inspections
which you will need to do periodically, depending on age. There are refillable
and exchangeable tanks. Don’t just assume your RV comes with refillables. New
or used, make sure you know what kind of cylinders are being included. New
tanks should come with OPD valves (overfill protection device). Older tanks
will have OPDs if a previous owner used them long-term, and had the valves
changed when their use was first required. Some information we’ve seen,
mentioned refillable steel tanks can’t have the valves replaced, while aluminum
tanks can. This information is best verified by a certified inspector. If your
tanks fail an inspection, due to the valves, the inspector will let you know if
they meet the requirement to receive new ones. And yes, it is an additional
cost. The following articles explain the basics of propane tanks and OPD
valves. To extend the life of steel tanks, keep abuse to a minimum. Excessive
corrosion and dents are other reasons a steel tank fails inspection, in which
case it will have to be replaced. As far as exchangeable tanks are concerned, you
will want to do a convenience/cost comparison of “rental” vs. ownership of
tanks. (Get a good, easy-to-use tank monitor regardless of tank type, so you
don’t find yourself out of propane at an inopportune time. For exchangeable
tanks, it’s best to take them back empty because you might not get credit for
any gas still in the tank.)
We were fortunate our trailer came with two 40lb. aluminum cylinders. If you conclude you need to purchase, we recommend buying the aluminum. Yes, they are more expensive and may be heavier because of thicker walls. But they last a long time. Our tanks are original to our trailer and other than a couple of small scuffs, don’t look their age. (Yes, they have the OPDs. Thank you, P.O.)
We were fortunate our trailer came with two 40lb. aluminum cylinders. If you conclude you need to purchase, we recommend buying the aluminum. Yes, they are more expensive and may be heavier because of thicker walls. But they last a long time. Our tanks are original to our trailer and other than a couple of small scuffs, don’t look their age. (Yes, they have the OPDs. Thank you, P.O.)
For those who are wondering if this info is really
necessary, we say it’s better to be informed up front, before you decide if a
certain dream suits your reality. Never mind the fact your dream is called a
Recreational Vehicle. To all levels of government, you are transporting a
hazardous material when that vehicle is carrying propane on a public roadway.
At the very least, this activity is under the authority of the Department of
Transportation (DOT). Some states will require additional certification for
inspectors, like Texas. Here inspection of propane cylinders requires Railroad
Commission certification, too. Such licensing might be optional for the RV
professionals you hire to pressure test your lines. Certified or not, a trained
professional will have the appropriate equipment to test for leaks and properly
adjust the pressure of your regulator. The regulator can’t be adjusted with a
spray bottle of soapy water. Just so you are aware, some LP refilling locations
like gas stations, farm supply stores or RV parks, while legally liable to identify
if it’s safe to refill your tanks, might not be licensed for inspection or
equipped to replace old valves or defective OPDs. When it’s time to have your
tanks annually inspected, you may have to take them to a dedicated LP supplier
instead. (Blue Flame is one example.)
⃰ The
only part of your propane system actually required by governments to be
periodically inspected, are the propane tanks. We’re not recommending
inspection of your gas lines due to any laws on the books, but because it’s a
best practice that falls under the category of common sense. Though it’s not
even required for a new system, why would you risk all the work you’ve done,
any new or restored appliances, and most importantly, your family’s safety to
save some money? Yes, paying a pro to check your propane could cost a couple
hundred dollars. Seems like pretty cheap life insurance to us.
The following info is for the DIYer in particular,
concerning the order of procedures. Don’t be afraid to establish a relationship
with RV professionals before you start any work on your gas lines. If you’re
planning to have them inspect your system, they would prefer you know what
you’re doing. Not certain about your tanks? Just plan on getting them inspected
and filled before the pro checks your work. They should have been disconnected from
the main line well before you removed the old copper, anyway. Do
not
let gas into your system before the pro is scheduled to check everything. They
must be present the first time the gas is turned on. We received this
information from a professional RV repairman. He has a mobile business and
happens to store his trailer in the same storage lot we use. He helped us clear
up some other things, such as reusing flared brass fittings, which he advised
against. The only reason we even considered reusing the old fittings was the
initial inability to find our 5/8” tees. By the way, if you start this project
and decide you’re not comfortable with it, having an established relationship
with a pro might help you get service a bit faster.
Still
ready to take the plunge and get your RV? Go forth with confidence and enjoy
your search. Remember, knowledge is power. Your knowledge will hopefully keep
you from embarking on a restoration project you’re not prepared to finish. You
also won’t regret knowing you can enjoy the benefits of your propane system, due
to proper installation and maintenance.
A fellow AS owner gave us the info about flared fittings at the hardware store. Though we’re both from the same area north of Houston, he and his wife initially made contact with us thru Airforums, before they bought a trailer last fall. While they are DYI and RV travel newbies who have occasionally picked our brains, they paid us back big time with the info. Those 5/8”-3/8” tees were really giving us fits. Sometimes, it can take a village to finish a project such as RV restoration/renovation. And you never know where useful information is going to come from. M & M, if you happen to read this post, thank you from the bottom of our hearts. You saved us from a lot of aggravation.