Have your patterns and all your supplies ready? Let’s
make some blinds.
Start by placing your pattern pieces on the fabric. It
doesn’t matter if you cut out the front or back pieces first. The curved sides
will create a bit more waste, but it’s possible to place the pattern pieces
close to each other in order to maximize fabric yardage. (I thought I took a
photo of this step, but I’m not finding it on my memory card. It’s not any
different than using any other flat pattern piece. In addition to designs on
the fabric, you will want to make sure the grain or the nap is going the same
direction on all your pieces.)

I cut out my back pieces first, then placed them on the
chenille to cut out the fronts. I chose to proceed this way so there would be
front/back pieces with matching edges. Since the chenille is on a 60” wide roll,
right side up, the lining piece was placed right side down (right sides
together).
After cutting the front piece, secure those 2 pieces
together with a pin or clip and set aside if you’re planning to cut all your
pieces at the same time. Don’t have a lot of workspace to accommodate unfinished
pieces lying about? No problem. Make sure you’re keeping track of the way your
pieces will need to be matched up when being fused together, and move to the
next step.

Place the fusible web on the wrong side of one of the
pieces. Line up straight edge to straight edge. Trim the web to match the side
curves. Depending on size of your blinds, you may need to cut another piece of
web to get full coverage. (If the front piece is not as heat tolerant, place it
on the bottom, with web then lining right side up. Save your scraps. Small
pieces of fusible web might be handy for other projects you might want to do
later.)

Follow the directions for your fusible web to iron your
blind sandwich together. Use a pressing cloth or piece of heat tolerant scrap
fabric between the blind and iron. If you have any fusible web going beyond the
edges, the pressing cloth will keep it off the iron. The cloth will also
protect your nice fabric from the iron.
Applying the double-fold bias tape to the sides and
bottom is next. You can try doing it with one piece mitered at the corners, but
there is a possibility a package won’t make it all the way around. It actually
looks nicer to trim one side at a time, than to have an overlap somewhere on a
side. Place the edge of the blind into the open side of the tape. Make sure the
blind edge is pushed all the way to the folded side of the tape. I keep the tape
on the cardboard it’s wrapped around, and roll it out as I’m sewing it to the
edge. It’s cut when I reach a corner.

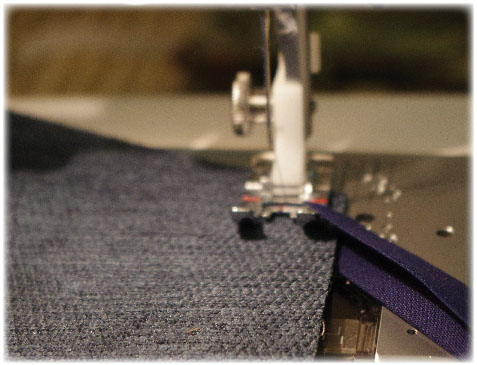
Using a single straight stitch the bias tape is sewn to
the edge of the blind. I don’t pin it, but just keep pushing it onto the edge
while I’m sewing. My sewing machine has a sliding switch that allows me to
adjust the machine’s speed. I keep it at the slowest speed, with the needle
positioned in the middle of tape.

Bottom edge with trim.

Curved side with trim.
After the blind is trimmed make the ties from the bias
tape. Each blind needs 4 ties. Mine are 18” long. Sew the ties closed either
with a single stitch down the middle of the tape, or double-stitch about 1/8”
from each edge.

When you have the ties ready, use a tape measure along
the top edge to determine their placement. It doesn’t matter if you work from
the front or back. Just make sure the ties are matched up on both sides before
sewing them to the blind (2 front, 2 back). If you’re making a separate “cornice” and plan to
place Velcro on the back of the blinds to assist with hanging them, cut the
loop piece at least an inch shorter than the top edge of the blind. You want to
keep the bulk out of the corners when you fold the flaps back. Pin the ties on
the front side of the blind if using the Velcro.

Ties pinned to the front.


Even though I was using self-stick Velcro, it was applied
to the back before the ties were sewn down. Start at one corner of the top edge
and sew to the other, catching the Velcro and ties in the stitching. The Hook piece of Velcro can be attached later, after the blinds are completed. Just keep the tape on it until ready to hang.

Place your blind on the ironing board with one curved side
facing away from you. Fold the curved edge under if the top of the blind is
facing you. If you’re looking at the back, fold it toward you. Your fold line
is going corner to corner, giving you a blind that’s square or rectangular from
the front, depending on the shape of your window. To make the fold on blinds
with heavier fabric, you may have to start by rolling the curve back until you
reach the corners. Press the fold down with your hand first, then come back
with the iron to press the edge.

Top-stitch about an 1/8” from the edge, just enough to
catch both the front and back in the stitching. The stitching provides an edge
that looks finished and helps to keep the side flaps where they belong. The
flaps will be pulled to the sides of the windows after the blinds are
installed.

Flaps folded to the back and top stitiched on both edges.


The flaring tool is used to curl the center down to the back.
It's the same concept used to put grommets together.

Applying the snaps is the last step. Follow the
directions provided with the product you purchase, in case the ones you buy are
different from the ones I used. But here are a couple of tips you might find
helpful. Mark the placement of your snaps on the back of the blinds. Don’t
bother with the small punch tool included with the snaps for making holes in
the blinds. Instead, make a small cut with the very tip of your scissors
through all layers, then push the shaft of the snap front through the opening.
To pound the front and back pieces together, make sure you’re working on a
solid surface which can support the use of a hammer. If your snap sets have a
small flaring tool like mine did, watch your fingers. The wall part of the
snaps is part snap, part screw. Go ahead and snap both sides together. After
the blind tops are secured above the window, pull the bottom of the blinds to
the wall and press the tips of the screws in enough to make a small mark. This
mark will tell you where to install the snap screw. Tie the blinds out of the
way first. (One thing to consider when determining quantity of snaps needed;
for blinds which are wide, you might want to put some snaps in middle too.)
Don’t want a separate trim piece covering the top of your
blinds? Purchase enough bias tape to give the top a finished edge. Leave off
the Velcro, sew the ties on first, then apply the trim. You could also bring
some extra of the back fabric over the top edge to the front to make
contrasting trim at the top of the blind. Make sure you fold raw edges under.
This is another area where you could use fusible web, or products like Heat-and-Bond
and Stitch Witch. These are basically fusible web that comes in a strip which
is wrapped around a spool. You will still want to top-stitch the trim edge to
keep it secure and give it a finished appearance.
My blinds are secured above the windows with self-tapping
metal to metal screws ¾” long. If I wasn’t making a trim piece (aka “cornice”),
I would have finished the top edge and considered putting snaps at the top,
too. However, I found the tiny, hand-held flaring tool to be inconvenient.
Definitely put the snaps at the bottom corners for easy opening, and use screw
covers to dress up your screws at the top. I found a vender pack of 50 chrome
screw covers for license plates on Ebay. I’m using them to dress up the screws
holding my trim pieces to the walls. Pro-dec is a vendor who sells all kinds of
screw covers, both in metal and plastic. The cost of their metal covers can add
up if you need a lot of them, but they do come in colors other than just silver.
Their plastic covers come in many colors.
Have fun making your blinds! Please don’t hesitate to ask
for assistance if the instructions aren’t clear, or you think a step was
overlooked.
Kristal
No comments:
Post a Comment